Tuesday, 20 February 2018

ACW, Test of updated Brigade Fire & Fury. Game at NBHW

Last Friday night at New Buckenham four of us sat down for a game of Brigade Fire & Fury. This was the first time we had played the updated version so the idea was to see what had changed and get to grips with the update before introducing them into general club use.
I rolled up a two vs two game using the Pick up Game section in the back of the rule book for a mid war eastern theatre encounter. The results can be seen in the pictures of the base labels below.

Union Force Labels

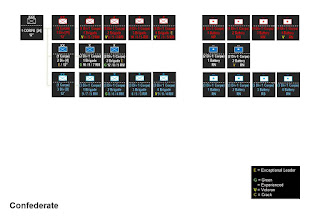
Confederate Force Labels

As can be seen the random dice roll selection resulted in a lot of artillery and in hind site I should have reduced this somewhat. The union were allocated a cavalry division to act as forward pickets and to see how they were effected, if at all, by the update.

Next it was time to come up with a battlefield and scenario. This of course had to include my new rail road items so I came up with the following map. The union would be defending the station and river crossing with cavalry outposts in the two farms while the confederates would be tasked with capturing these. A 3 x 4 foot table was selected to try and get the forces engaged quickly for rules evaluation.

Table map [ 3' x 4' ]

The terrain features were classified as follows for movement:
River - Broken Ground for Infantry and Cavalry, Impassable for Artillery.
Wood - Rough Ground
Open Wood - Broken Ground
Orchard - Broken Ground
Wheat Field - Open Ground
Poor Road - Open Ground (even though on map it's drawn as Good Road)
Fences - As per the rules no effect (we may house rule here)

I also allocated suggested deployment positions for the Union forces. As it happens, on the night we decided to deploy one corps on each side of the road rather than one behind the other.

Table with suggested troop deployment

So how did the game play?
Well a lot of book reading occurred in places, mainly related to artillery plunging fire and line of sight effects of various terrain. The change in formation into line and supported line caused some discussion as this seemed different to what we had played before, but we couldn't remember if the difference was due to a house rule or not. The amended firing phase was picked up quite quickly even with the greater range of weapon types now catered for and it didn't take long to realise, that yes, firing has been made a lot more effective. The changes in the arcs of fire was also seen as an improvement with players having to take more care with positioning to bring fire to bear. If you didn't know the arcs have reduced from 45 to 30 degs for infantry and from 30 to 15 degs for artillery.

Union troops line the riverbank.

Union guard the station, dismounted cavalry having fallen back.

Rebel yell, straight over the bridge.

Union await the charging rebel column.

Unfortunately with all the discussion between moves, and because the Union cavalry pulled back before contact, we didn't get any melee combat this game. We did find artillery fire seemed more effective under these rules and when we got close enough so was musketry. We got the attack by the confederates over the bridge wrong this time but know what to correct next time, which will be in a few weeks time when we intend to get to grips with a few more aspects of the update.

First impressions of Brigade Fire & Fury are very good with, it was felt, several improvements over the original .

After a bit of tweaking to OOBs and map I will make these available in my Scenarios download section.
UPDATE, now available as ACW Defend the Station.

UPDATE 2, have added some Power Point resources that I use to do the maps to my Download section.


As usual more pictures at the club's Facebook Gallery

Tony.


Sunday, 18 February 2018

15/18mm American Civil War: Update 2, First buildings


Having decided on a scale to use for railway track, see previous update here, I now wanted some buildings to go with it. So it was back to Peter Pig's website and it's Range 21 Scenery for a look. In their American Western, AWI and ACW range, at items 29 and 30 were a 15mm Western/ACW Water tower and Station. These were duly ordered and another club member picked them up from the Vapnartak show in York.

These were my first resin buildings, but with advice from the club terrain guys and plenty of YouTube watching, I pretty much knew the pitfalls. So after a soapy wash and dry they were assembled and primed with Vallejo grey surface primer, including the underside of the station.

Assembled and Primed.

As I intend these to be used for ACW games and was thinking of Northern Virginia I spent some time looking for info on the roofing material used, slate tiles or wood shingles? I settled on slate tiles for the station, the water tower was obviously wooden shingles.

Just awaiting finishing touches.

So the station roof was base coated Basalt Grey for the tiles and Gunmetal Grey for the lead flashing. This was then washed with GW Drakenhof Nightshade to give a bluish tinge then again with GW Nuln Oil. A thinned Cam Olive Green was applied in places to represent moss staining.
The main wooden areas on both were base coated with Beige Brown with the beams and shutters of the station picked out in Leather Brown. Some lightened planks were added for contrast. These areas were all washed with GW Agrax Earthshade.
The window and door frames were painted Prussian Blue as I wanted some colour and the Virginian state flag is blue. The window panes themselves were also painted this colour then received three washes of Drakenhof Nightshade and one of Nuln Oil. The windows got two coats of satin varnish after the whole building was matt varnished. Apart from a few sign boards that was it for the station.

Completed station.

Completed station.

Completed station.

The water tower after getting the same base coat as the station was again washed with Agrax Earthshade while the roof shingles were dry brushed with two lighter browns. The spout and bands were painted with Black Grey and then washed with Nuln Oil before the bands were dry brushed with a mixture of Gunmetal Grey and Red Leather to try nand imply rust. If was then based on a spare Renedra 2" square plastic base for stability.

Completed Water Tower


So that was them finished and I think they came out OK. Plus they made it onto the gaming table a day later.

In the thick of it.

Tony


Thursday, 8 February 2018

15/18mm American Civil War: Update 1

First update on my ACW project, following on from my initial post here.

As I left it I had a work in progress tray as shown below and was trying to decide on how to progress with painting the figures.

In work tray from previous post.

Having come to the conclusion that the Vallejo Ultramarine primer with a wash over the top didn't do it for me as a jacket colour the decision I then had to make was whether to continue and use this as my primer or switch back to grey. So as I needed some more artillery personnel I chose to prime these in grey before block painting the jackets and trousers on both groups in my chosen colours, Vallejo Dark Prussian Blue and Grey Blue respectively. For the results see the image below.

Primers: Vallejo Ultramarine blue on the left, Grey on the right.

The grey primed artillery figures seemed to match better with my existing artillery crews so I was happy with this. As for the figures primed with the Ultramarine, they too look OK and as I have two bottles of it I may as well carry on using this for my new infantry units. But first up was completing my artillery.

Two batteries I decided to paint as "horse artillery", left on the picture, which required a little bit of work on the legs of the dismounted crew. I shaved away some of the lower trouser material and then painted this area, as well as the feet, black to give the impression of higher cavalry style boots. They also received more red trim on their jackets. One battery got Napoleons and the other, 3" ordnance.
The other four batteries were painted as "foot" artillery, again with an even split between smooth-bore and rifled barrels.
Whereas on the supply wagon I added traces/chains to both sides of the draft horses, with the artillery limbers I have chosen to only attach them to the outside of the horses, for now anyway.

Artillery completed.

Before I got on with the generals and the mountain of infantry I turned my attention to a bit of terrain, specifically railway track. As we all know the railways were a vital resource during the Civil War so many battles or other encounters will include this terrain feature, but what to use? The obvious was model railway track, but then the question of scale came into play.
Initially, based on trying to get a more realistic ground scale for Fire & Fury I chose N Gauge, upper example in the picture. Having got this I discovered, a few problems. First, although a better ground scale I think it just looks wrong next to the figure bases. I know the figures are an abstract representation but that doesn't make it work for me. Second, if I wanted any rolling stock to add as eye candy it would have to be fully functional model railway stock, most likely imported from the US and therefore very expensive for a bit of wargamming fluff. So back to the research.
A bit of trawling around the internet later and I discovered 15mm white metal railroad models are available from Peter Pig's western range, which are also suitable for ACW. These are scaled to fit on TT Gauge track which is also known as HOm Gauge, so I ordered some.
This track is seen at the bottom of the picture and while technically even more out sized, ground scale wise, I think it looks much better alongside the figures and the availability of sensibly priced rolling stock seals it for me.

Track size comparisons.

So with that decision made it was back to the generals and infantry. Starting with the generals, superb AB figures, I had got as far as painting the horses tack when I noticed that on certain poses, those with extended necks especially, the infill between the reins below the head meant for a very noticeable solid block of black. So it was out with the pin drill and craft knife to remove as much of this infill as possible. On the horse with its head down this infill was hardly noticeable and so I left it alone rather than risk damaging the figure.

Infill cleaned out on bridle on right hand figure

Best get on.

Tony.