Wednesday, 2 January 2019

4th (Queen's Own) Regiment of Dragoons

Next up in the continuing Peninsular War project are the 4th (Queen's Own) Regiment of Dragoons. This regiment formed half of Brigadier General Henry Fane's heavy cavalry brigade at Talavera along with the 3rd Dragoon Guards Regiment. According to Oman they mustered around 545 personnel on the day.

For this unit I chose Front Rank miniatures as they have fore and aft bicorns, which is how I believe they would have been worn on campaign. Warlord plastic figures are totally wrong for the early part of the Peninsular War as the torsos are wearing post 1812 jackets, even if you do stick the bicorn or watering cap head on them. If I lived in North America I would probably have gone for the Brigade Games miniatures. Eagle Figures do an early war dragoon too but with the bicorn worn side to side.

After the very minimal amount of clean up required for Front Rank castings, a gentle bit of force was applied to a few heads and sword arms to get some more variation in pose.

Uniform distinctions were green/blue green facings with silver lace for the officers and white for the other ranks.

For more information on this unit see Jonathan Jones' blog post at  JJ's Wargames (seems silly to post the same info again)

First six mounted on rods and primed

I started by drilling a hole under each figure and mounted them onto some rod for painting. They were then brush primed with Vallejo Grey Primer.

Reds and facings done.

Once again I used Vallejo paints. The colours I used this time were:
  • Scarlet (817), officer's Jacket.
  • Vermillion (909), other ranks' jackets and all valises.
  • Dark Vermillion (947), cloaks.
  • Military Green (975), facings  , although I'm undecided if this is too dark and bugle cords.
  • White Grey (993), breeches.
  • Buff (976), officers gauntlets, haversacks and saddle bags.
  • Ivory (918), other rank's gauntlets.
  • Off White (820), sword belt, sword knot, carbine and cartridge box strap.
  • Black (950), cartridge box, bicorns, boots, small box on rear of valise.
  • Gunmetal (863), scabbards, sword hilts, carbine barrels, stirrups, buttons and some buckles.
  • Brass (801), chin scales, carbine butts, bugle and some buckles.
  • Oily Steel (865), sword blades.
  • Black Grey (862), carbine lock cover.
  • Leather Brown (871), canteen strap, saddle equipment securing straps.
  • Saddle Brown (940), saddle and stirrup straps.
  • Silver (997), officers lace.
  • White (951), other ranks lace (a drip or two of silver mixed in).
  • Flat Brown (984), carbine wood.
  • Flat Flesh (955), flesh.
  • Pastel Blue (901), canteen.
  • Red (926), officer's sash.

Just the washes to go.


Officer.
Sergeant.


 A wash of Citadel Agrax Earthshade and they were done.

The first thing I did with the horses was to trim the tails to give the nag-tailed look of British dragoon mounts. The horses were then spray primed with Army Painter Fur Brown (CP3016), left over from another project. They are then base coated using Coat d'Arms horse tones, in this case
  • Horse-tone Chestnut (223)
  • Horse-tone Bay (224)
  • Horse-tone Brown (235)
  • Horse-tone Grey (236)
As "all other regiments of heavy cavalry on the British establishment are to be mounted on nag-tailed horses of the colours of bay, brown, and chestnut." and the 4th fall into this category.

Manes, tails, sometimes noses and fetlock areas are then painted in contrasting colours using an image I found online as a reference. I use Off White (820) for the white markings. I paint hooves using a mix of Black Grey (862) and any flesh colour to give the grey a little warmth in tone.

Horse colour guide

All tack was painted thus
  • Leather Brown (871), leather straps
  • Gunmetal (863), bit
  • Brass (801), buckles
All horses then received a wash of Citadel Agrax Earthshade, except the grey which got a wash of Citadel Nuln Oil, while the tack is washed in Citadel Agrax Earthshade too.

The riders were then removed from their painting sticks and superglued to their mounts after first scraping the contact points of paint to get a better surface for glue adhesion.

The first six completed on their bases. Basing material to be added after the second six join them.

First six completed.

Once again just after completing these six I read that Horseguards had issued an order several years previously to stop buglers being mounted on greys, oops!

"The custom of mounting trumpeters on grey horses is to be discontinued, and they are in future to be mounted on horses of the colour or colours prescribed for the regiments to which they belong.

Harvey Calvert,
Adjutant-General.
Horse Guards
10th August, 1799."

not repainting it now. The horses eyes I paint in after varnishing, using Glossy Black (861).

The whole unit awaits basing materials.

The second six were then done in the same manor and based ready for the texturing to be done. At this point I realised I had attached the second batch to their group bases before painting the buckles and bits on the horses tack, Doh! Then to make it worse I realised I'd done the tack on the first six horses in Saddle Brown not Leather Brown. Having decided I preferred the Leather Brown look, more repainting was required.

All this and basing was completed an hour before the end of 2018, result.

Post basing and touch ups and corrections.

With their casualty counter

And that was that, finished. Well I did paint in the horses eyes after varnishing as previously mentioned. Next a Perry RHA 6pdr and the Perry Portuguese telegraph station

Tony.


Monday, 5 November 2018

28mm Medieval update.

So with plans at the club for some Lion Rampant games to finally utilise everyone's retinues that they started a few years ago, some even completed them, it was time to revisit mine. So far I had two units of mounted troops and half a unit of foot troops (the basing has been finished on the foot troops since).

First batch from over two years ago.

So back out came the box of Fireforge Foot Sergeants and some more assembly commenced. Now I required some archers and while this box does contain parts to make crossbowmen I decided this was far too Frankish for my late C13th English. This led to the purchase of a box of Medieval Archers which was split fifty-fifty with another club member as I only needed twelve out of the twenty-four this box provides part for.

So the next batch were assembled and started. Shields are painted separately an attached at the end.

Next batch started.

After these were completed I was left with just eight archers to go to complete my retinue.

Also at this time I ordered some MDF sabot trays and circular bases from Warbases. The circular bases I drilled in the centre to allow for a miniature rare earth magnet to be inserted. I normally use self adhesive magnetic sheet on the bottom of my bases but this would raise them above the top of the sabot bases, so I went with magnets. The mounted figure were based on thinner plastic bases so I used magnetic strip on these.

Magnet in base.

I also decided to string the bows and used fine strands of wire for this. A few cut down embroidery pins were re-purposed as arrows for those about to loose. Some small pieces of thick paper were added as an attempt to give an illusion of fletching.

Troops ready for completion of basing

As an experiment I painted the slots in the sabot bases with a ferrous paint, hoping that the magnets in the figure bases would attract to them and provide an extra level of grip when moving these bases. It seems to have worked.

Sabot bases with slots painted with ferrous paint.

The completed units with just varnishing to go, ready for some games of Lion Rampant.


Next up, back to the Napoleonic British Peninsular army and some heavy dragoons.

Tony.


Wednesday, 10 October 2018

A Brief Update.

Having finished my Napoleonic engineers' cart from Warbases I found myself needing some individual small wooden barrels to be used as gunpowder barrels in the scenario the cart was purchased for. I had a look around at The Other Partizan when I bought the cart but could not find anything suitable.

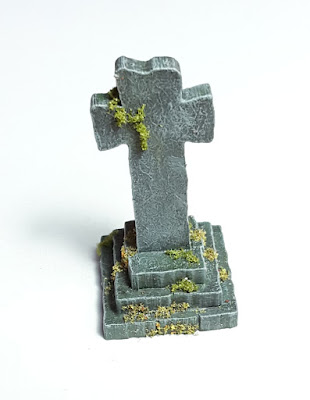
As I neared completion of the cart I started looking online for suitable barrels. They needed to be individual and of a size that looked like a 28mm figure could carry them. After some googling I came across Supreme Littleness Designs and found something that might be suitable, Small wooden barrels so I ordered these. I also picked up their Old stone cross as a bit of fluff.

They duly arrived a couple of days later followed shortly after by an email containing a PDF with assembly instructions for the barrels.

The Barrel sprue with parts for one punched out.
Centre section assembled.

The small barrels consist of a central cross member onto which fit the central and upper and lower side "slices". The tops and bottoms then fit on these, the centre of the ends can be punched out too to give the effect of opened barrels.

The cross was similar with two layers of plinth sliding onto the bottom of the cross before this assembly was fixed to the bottom plinth.

The barrels were just painted with a light brown paint for the wooden sections and gunmetal for the bands and then given a sepia wash. I didn't bother priming these.

The cross was primed grey then painted with a medium grey before a dark wash then a greenish wash, around the base, was applied. It was then drybrushed before some flock was added. I decided against basing the cross so it would fit on whichever terrain surface I happened to use it on.


Completed barrels

Loaded onto the now based cart.

Old stone cross.

I think these have come out really well and are really worth the very reasonable price.


Wednesday, 26 September 2018

Lutterberg 1759. Game at NBHW

Friday saw a fictitious Seven Years War action played out using Osprey's Honours of War rules. The scenario was based on a "what if" hypothesis, in this case what if Duke Ferdinand had pressed the retreating French rearguard after the Battle of Minden.

The field of battle. Lutterberg centre left, allies on this side French on the right.

I had command of a the Hanoverian contingent consisting of brigade of four infantry battalions, a battery of medium artillery and a brigade of two cavalry regiments. I also had control of an independent unit of Jagers and regiment of Hussars. These formed up on the allied left with the hussars out of sight in the woods.

My command with cavalry still to arrive.

The British would arrive through the village of Lutterberg in the centre and on the right flank were deployed the Brunswick and Hessian contingent.
Unknown to the allies was the condition of the ground to the front of the British and Hanoverian forces. This turned out to be patchy marshy ground that caused problems with movement for those crossing.

French right flank facing my Hanoverians and centre right facing the British

French left flank, as seen, facing the Brunswick and Hessian units, and centre left.

The fiercest fighting developed on the Allied right, where the Brunswick and Hessian contingent fought the French left flank for control of a strongly defended hamlet. A flanking attack was met by concealed French infantry and cavalry who appeared from the nearby woods. A Brunswick battalion broke before the French horse but the latter were then scattered by the fire of a Grenadier battalion. French losses mounted as did those of the Brunswick and Hessian's. By the time the French rearguard was ordered to retire the Allies had finally got a foothold in the hamlet and the supporting french units on this wing were broken but the Germans had paid a high price for this limited success.

The concealed French advance out of the woods.

First assault goes in.

The grenadiers arrive in support.

The British in the centre were a bit tardy in their advance from Lutterberg and by the time the forward units found themselves mired down in the boggy ground in front of the French centre they were a bit isolated. This lead battalion soon came under sustained artillery fire with the inevitable result and together with its supporting battalion the survivors recoiled back up the slope to the safety of the late arriving battalions and cavalry. From here the British horse and foot watched as their artillery batteries dragged their pieces through the bog and engaged the French centre, which contented itself with retiring just enough to stay out of effective range.

The British left column arrive.

Over on my flank I eventually got my battalions into position to start firing upon the French occupying the hamlet to my front with my units of cavalry to their rear as support.

Hanoverian cavalry arrive in support.

Hanoverians about to cross the stream, British under heavy fire in the centre.

Fearing the arrival of French cavalry, there were some off the table, I moved the hussars out of the wood up to my left flank by the stream and proceeded to cross with my infantry. At this point the French grenadier battalions holding this flank advanced out of the hamlet to engage my forces. A fierce firefight and melee ensued and my lead battalion fell back over the stream.

French grenadiers and Hanoverian infantry engaged.

At this point the French cavalry did arrive behind the hamlet to my front but only, as it transpired, to deliver the orders for the rearguard to withdraw.

The game was called at this point as a French victory as the rearguard would have be enable to withdraw largely intact, only their left flank having taken any substantial casualties, whilst inflicting significant casualties on the pursuing allies.

This game maybe proves why, historically, Duke Ferdinand chose not to engage when the French rearguard turned and formed up.

Another great game where once again I claim no responsibility for any of the superb miniatures on display.

For even more photos and info see the club Facebook album Lutterberg 1759

Tony.

28mm Napoleonic British engineers.

After seeing James Roach's AAR for a game he titled The Bridge at Hermoso Santo I decided that this looked like a fun scenario to put on at the club.

This would however require an engineers cart and some British engineers. Fortunately The Other Partizan show was due so I purchased a MDF / Resin engineers cart from Warbases along with one of their Heavy Draft Horses.

For the figures it was into the bits boxes. The engineering officer I made using a Perry metal officer from the BH 106 Colonels in bicornes ( Worldwide 1808-13) set with the lace on the jacket front removed. I should have removed the gorget as well but forgot.


As for the others, technically Royal Military Artificers until 1812 when they became the Royal Sappers and Miners, I used two left over Victrix artillerymen and two Victrix centre company figures, all with the shoulder tufts removed. These were painted to match the figures in Plate D of the Osprey book MAA 204 Wellington's Specialist Troops.


Apparently most of the field engineering work was carried out by the Royal Staff Corps troops as the
Royal Military Artificers were in short supply and being controlled by the Board of Ordnance rather than Horse Guards the usual inter department coordination problems no doubt arose.

Still need to base the cart but overall I'm happy how these came out and I'm looking forward to the game.